Configuring Hosted Appointments
Last updated November 15, 2024
After you have enabled hosted appointments you will need to create configurations for the appointments. Appointment configurations are where administrators set guidelines around when appointments happen, who can attend, how many appointments a participant can host or attend, and the terminology used within the app. The basic appointment configurations are set in four tabs:
- Roles and locations
- Targets and Limits
- Invitations and reminders
- Custom terminology
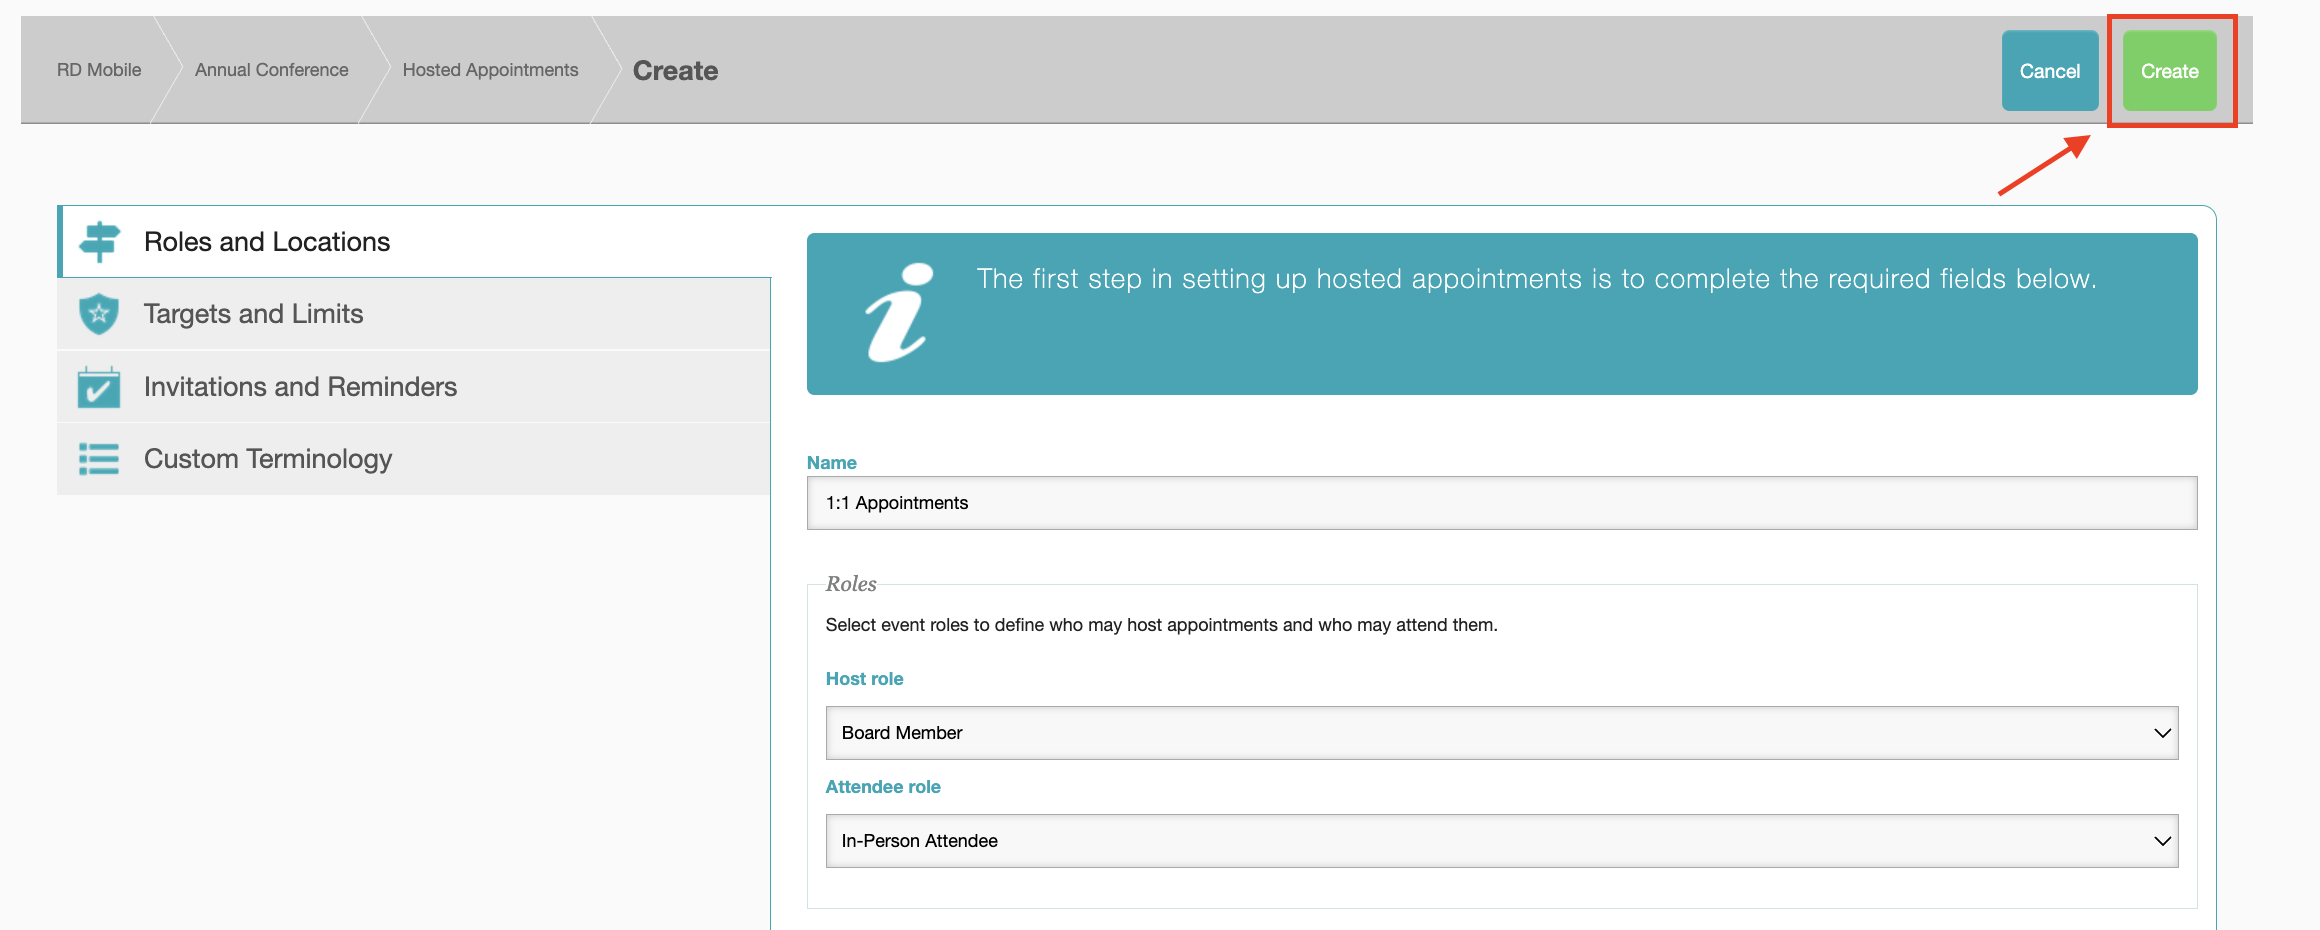
Roles and Locations Tab
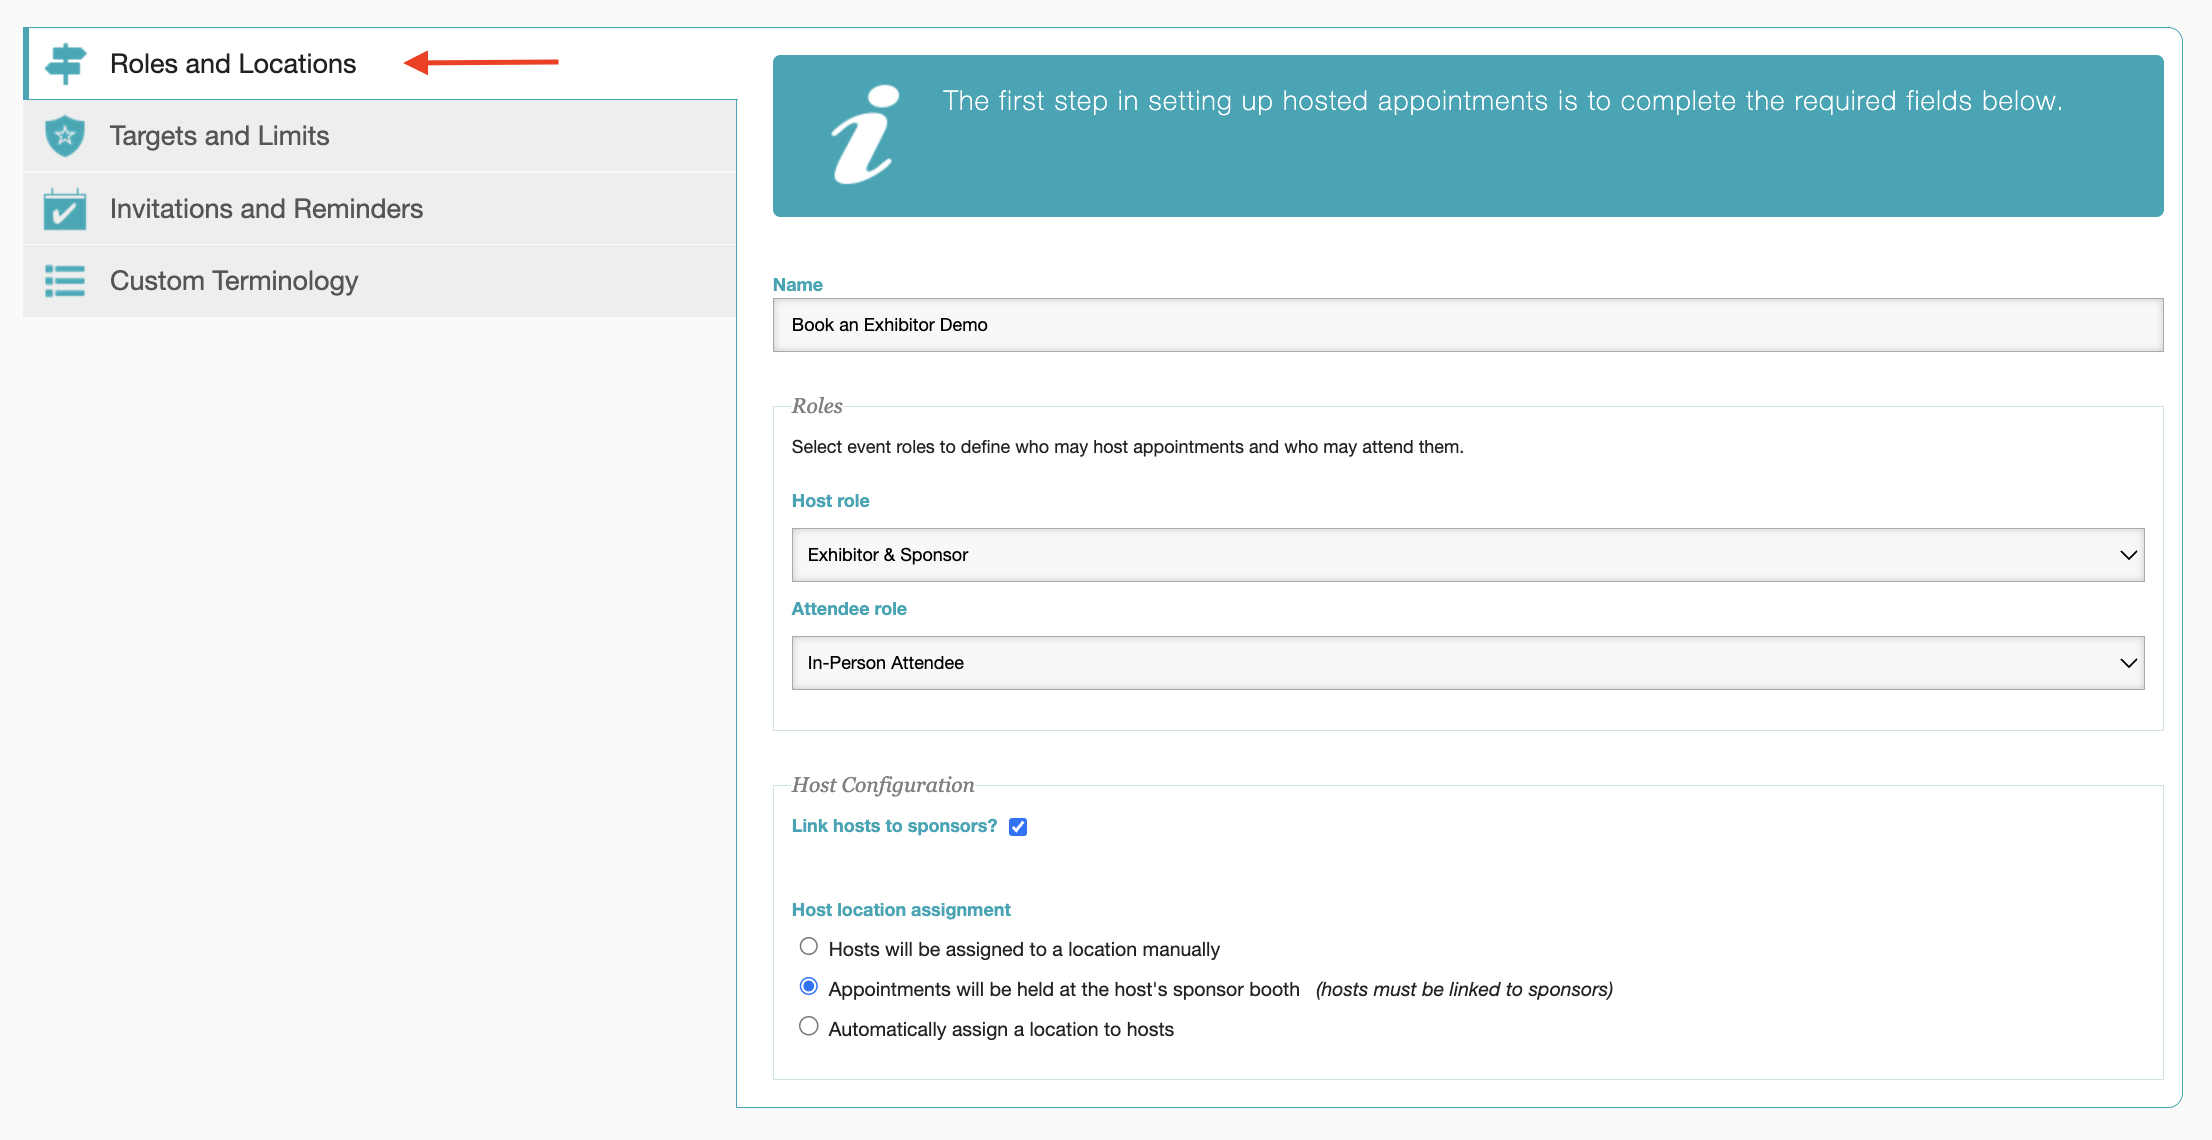
The Roles and Locations tab is where administrators set which roles may host and attend appointments, and where the appointments will occur. There is a one-to-one relationship between appointment hosts and attendees.
Appointments can be attended or hosted by multiple roles, but the administrator should create a configuration for each appointment host and attendee combination. It is also possible for the host role and the attendee role to match, for example, Attendees may host appointments, but also attend appointments hosted by other attendees.
Host & Attendee Role pre-populate with the roles the administrator created when setting up the event. If you have not created your roles, or if you need to add a new role, please add the role to the event and then return to the appointments section.
Here's a guide to understanding the required fields:
Appointment Roles
Name (required) - type in the name for the new configuration. Use simple clear to understand terms so you can quickly identify which roles are being managed within the configuration. For example Sponsors hosting Attendees, or Exhibitors - Sponsors, where Exhibitors are the Host and Attendees are the appointment attendees.
Host Role (required) - The role that will host the appointments.
Attendee Role (required) - The role that will book attend the appointments.
Locations
Link hosts to exhibitors - ties the exhibitor role to exhibiting companies. This is option MUST be selected when:
- There is a limit on the number of appointments an exhibiting company can host or attend
- Exhibiting companies will host their appointments in their booth.
Host location assignment Section
Administrators may assign appointment locations manually, automatically, or appointments may be held at the exhibitors booth. The appointment configuration defaults to manually assigning locations.
Select the appropriate roles, and location option, then use the left side menu to navigate to the 'Targets and Limits' tab to continue your configurations. You may also select the green 'Create' button at the top of the page to save and create your appointment configuration, and return to the additional tabs later.
Tip: Administrators will be provided the ability to add the location details later.
Targets and Limits
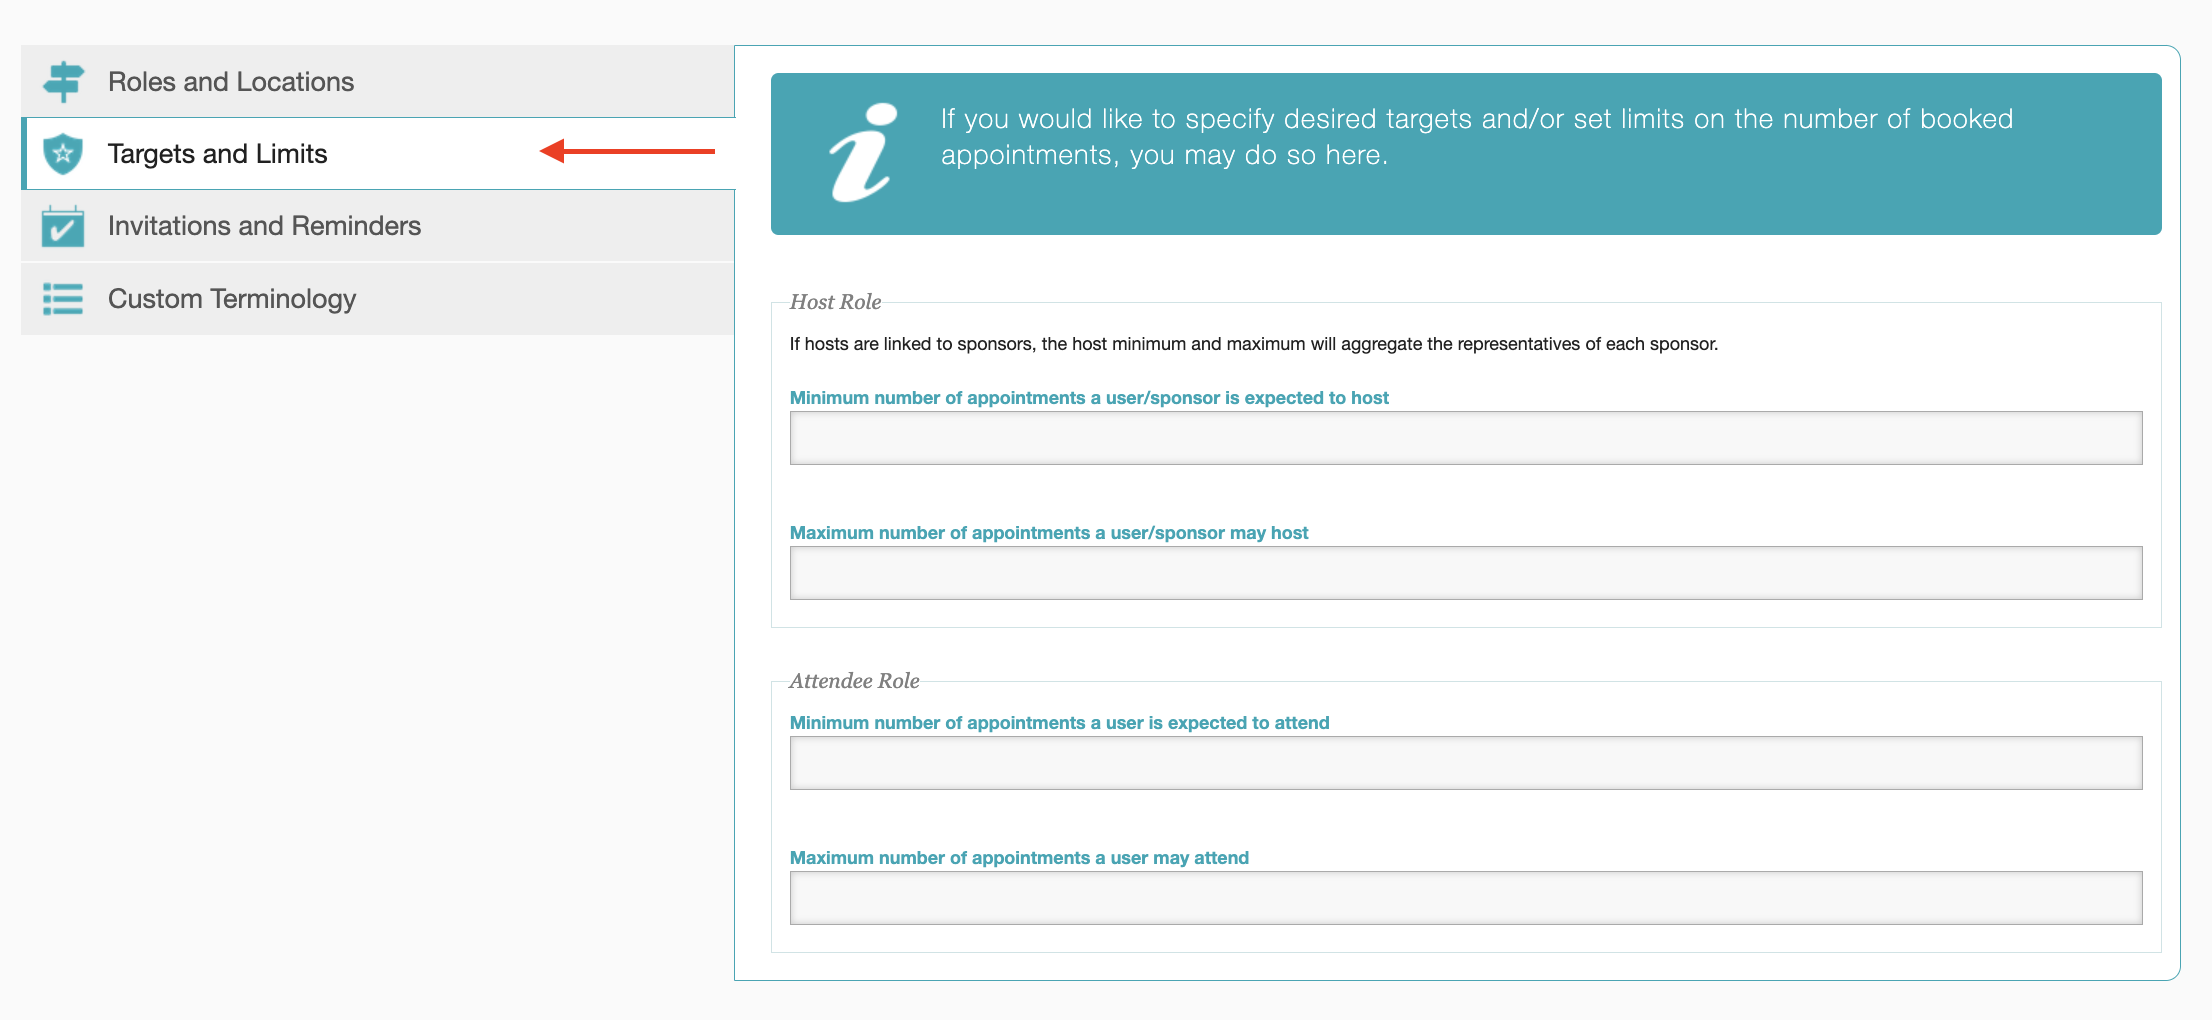
The Targets and Limits tab is where administrators may set a minimum and maximum number of appointments that may be hosted or attended. If there are no limits on how many appointments can be hosted or attended, skip this tab and proceed to the 'Invitations and Reminders' tab.
The 'Host role' section is used to set limits for appointment hosts, while the 'Attendee role' section is used to set limits for appointment attendees. Use the drop down or type the numeric value to set appointment minimum and maximum values.
Tips:
- Minimum and Maximum values are not required and should be left blank when no appointment limitations are in effect.
- Setting a minimum value does not require a maximum value to be set, and vice-versa.
- Limitations for hosts does not require limitations for attendees to be set, and vice-versa. e.g, a Host may be required to host a minimum of 5 appointments this does not mean attendees are required to attend at least 5 appointments.
When you have completed setting the appointment minimums and maximums, use the left side menu to navigate to the 'Invitations and Reminders' tab to continue your configurations. You may also select the green 'Create' button at the top of the page to save and create your appointment configuration, and return to the additional tabs later.
Invitations and Reminders
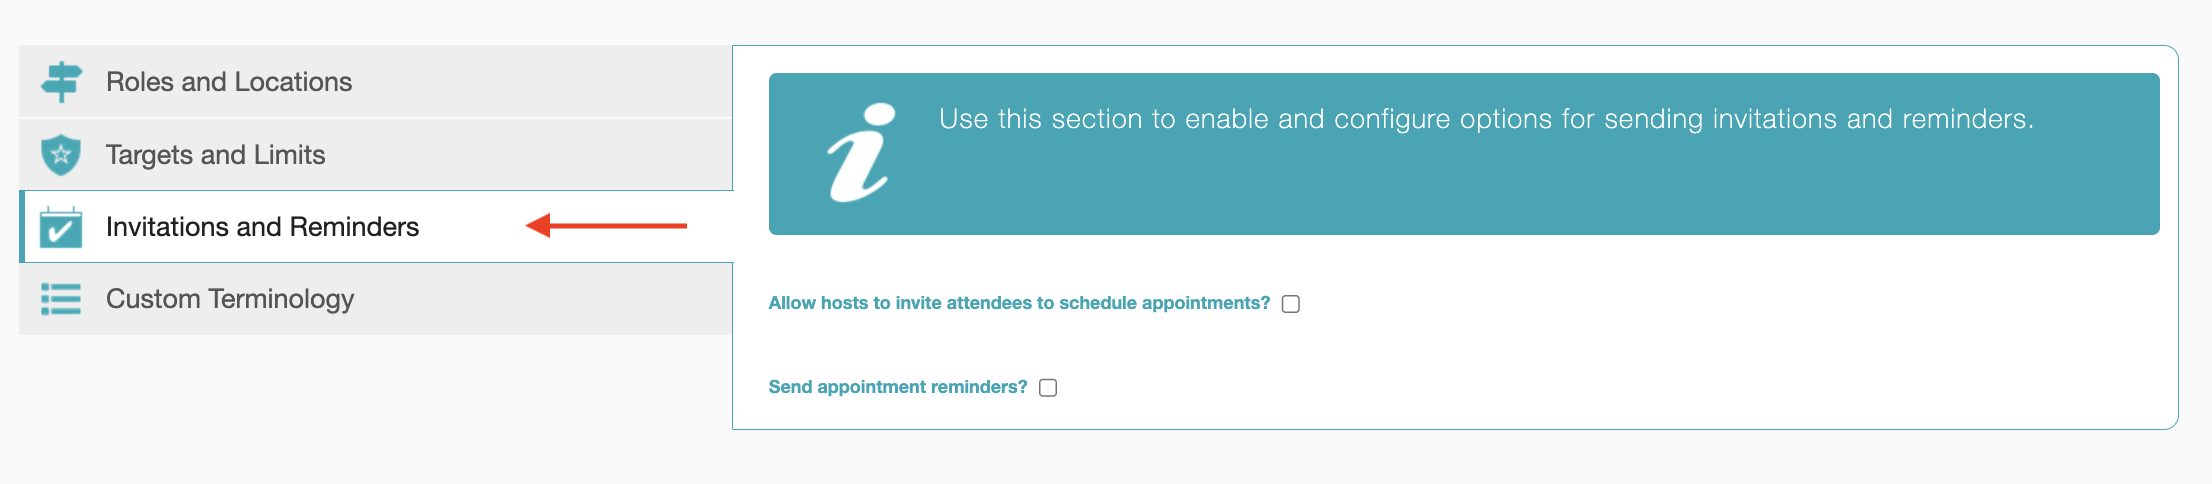
The Invitations and Reminders tab is where event administrators enable appointment hosts to send an email invitation to book an appointment.
Turn on appointment invitations check the box labeled 'Allow hosts to invite attendees to schedule appointments'.
We recommend turning on appointment reminders for attendees by selecting the 'Send appointment Reminders' checkbox. Use the drop down to select the lead time for the reminder, the default is 15 minutes prior to the appointment time.
Notifications may be sent via email only or via email and push notification. We recommend allowing notifications to be sent via email and via push notification within the app. Under 'Notification Option' choose between email plus push notification (recommended) or Email Only. When you have completed setting the Invitations and Reminders, use the left side menu to navigate to the 'Custom Terminology' tab to continue your configurations. You may also select the green 'Create' button at the top of the page to save and create your appointment configuration, and return to the additional tabs later.
Custom Terminology
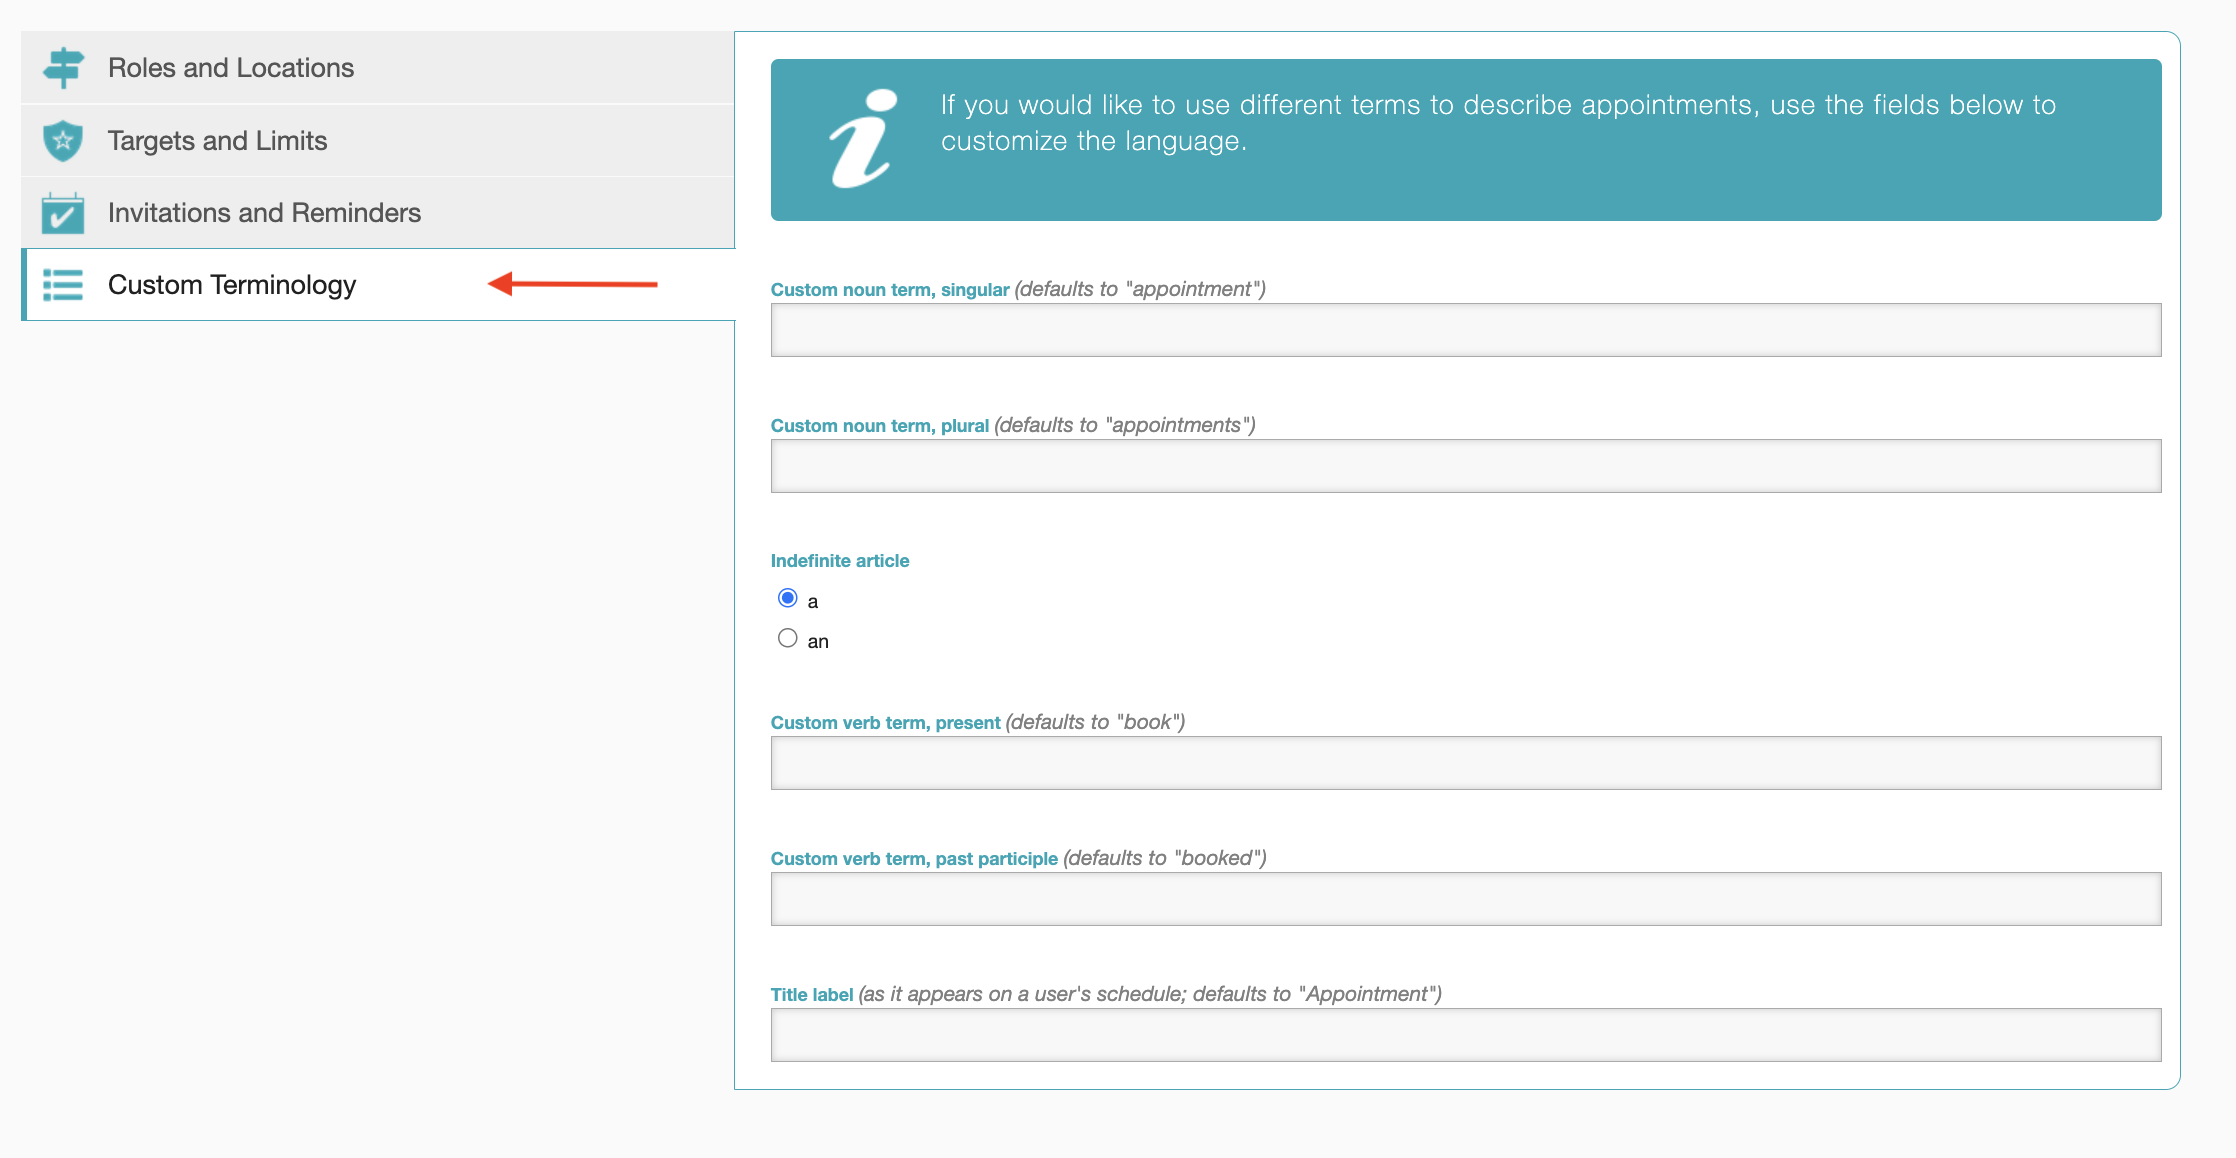
By default the terms appointment(s) and book(ed) are used within the app, the back-office, and on the event web-site (if applicable) to refer to booking an appointment. Administrators may overwrite these default terms by using custom terminology, for example an administration may wish to use schedule and scheduled to replace book and booked. Or change the indefinite article from 'a' to 'an'. To update the terminology type the preferred singular and plural noun for appointment and the preferred present and past tense verb for book in the text boxes. You may also use a custom Title label to refer to the type of appointment a customer is booking. Here are examples of common Title labels:
- Exhibitor Demo
- Speed Networking
- Mentorship Session
- Abstract Review
- Portfolio Review
- Professional Headshots
When you have completed this section, navigate to the green 'Create' button at the top of the page to create the appointment configuration, and to move on to the 'Add Hours' screen.
RD Mobile FAQ
Got a quick question? Check out RD Mobile's FAQ page for a quick answer. A collection of our most common client questions all in one place!
- Can I Copy and Paste an Event?
- What images can I upload to brand my app?
- How can I make changes to my app store listing?
- How often can I update event content in the apps?
- Registrant Profile vs. Participant Profile
- Do unpublished events automatically reflect changes I’ve made to event content?
- Are there differences in how Engagefully looks or behaves across different devices?
- How soon will attendees see the updated content on their devices?
- Can attendees export their sessions to their device calendar?
- Will Engagefully EVENTS work when the attendee doesn’t have Internet connectivity?
- Is it possible for attendees to manually fetch the most recent content?
- Does RD Mobile have surveys and polls?
- How will the custom values appear in the app?
- Where will ads show up?
- What is the difference between the Attendee Roster and Attendee Social Profiles?
- What is RSS?
- How do I remove flagged posts, photos, and comments from the app?
- What is the Personalized Dashboard?
- What different content can display in the Dashboard?
Get Started With Conversations
RD Mobile's Conversations provides a space for members, event participants, committees, and groups to connect and engage. Conversations is available as an add-on to RD Mobile’s Engagefully platforms.
About RD Products
RD Mobile’s industry-leading Engagefully & Engagefully EVENTS apps & platforms power year-round member engagement as well as in-person, hybrid/blended & virtual events - on both mobile & desktop devices.
Get Started With Year-Round Content
Ready to set up your year-round content on the Engagefully platform? Follow these steps to kickstart your engagement.
On-Site Tools & Support
This is a collection of tools, tips and best practices to support your participants leading up to and during your event.
Publish & Promote Your Event
Your event is ready to go, now it's time start engaging participants.
- How to Publish Your Event
- Invitation Email
- Follow-Up Emails
- Email Templates
- App Marketing Resource - How-To Guides
- Increasing App Downloads & Engagement - Marketing Campaign
- App Marketing Resource - Digital Business Card Exchange Promo Image
- App Marketing Resource - Website Samples
- App Marketing Resource - Spinner Samples
Add Basic Event Content
Ready to start adding content to your new event? Learn the basics here in this step-by-step guide.
- How do I create a Notification?
- Setting Up Sessions
- Setting Up Speakers
- How to Reorder Speakers and Designate Speaker Roles
- Setting Up Exhibitors
- How do I create tags for my Event?
- How to Add Registrants
- Registrant Profile vs. Participant Profile
- How to Manage Content In Bulk
- How do I enable and manage the event Dashboard?
- Add a New Menu Item
- Add a Map
- Setting Up Ads
Advanced Event Features
Want to supercharge your event? Browse through this collection of advanced features to determine what your event needs to take it to the next level.
- Event Roles
- How to Reorder Speakers and Designate Speaker Roles
- How to Create Exhibitor Booth Staff, Moderators, and Sponsor Representatives Using Custom Content.
- How to Create Custom Content
- What are Custom Labels used for?
- Event Integrations FAQ
- Embed Sessions on Your Web Site
- Embed Speaker Details on Your Website
- Embed Exhibitor Lists on Your Web Site
- How to Add Surveys, Evaluations & Polls
- Exhibitor Management Portal
- QR Code and Virtual Session Check-In
- Digital Business Card Exchange
- Setting Up Gamification
- Arranged Appointments
- Embed YouTube Content within Sessions
- Embed Vimeo Video Content within Sessions
Create a New Event
Ready to create a new event on the Engagefully & Engagefully EVENTS (formally Eventsential) platform? This step-by-step guide will walk you through creating and configuring a new event.