On-Site Badge Printing Portal
Last updated April 14, 2022
The On-Site Badge Printing Portal allows staff and volunteers to retrieve, edit/create, and print badges for attendees on-site without having access to the Backoffice.
For authorized staff to access the Badge Printing Portal, they will need the following from the event admin:
- The Portal URL: https://backoffice.rdmobile.com/BadgePrinting
- Login Credentials: An event-specific Username and Password configured in the Backoffice.
This article will outline how to:
- Enable the Badge Printing Portal by setting the:
- Badge style and
- Login credentials
- Access the Portal as:
- Backoffice Admins
- On-Site Staff and Volunteers
- Edit and Print badges through the Portal
NOTE: Badges in the portal must be printed individually. There is no functionality for printing badges in bulk.
How to Enable the Badge Printing Portal
- Log in to the Backoffice, choose an event, then click Edit Event on the top-right-hand corner and navigate to Registrant Badges:
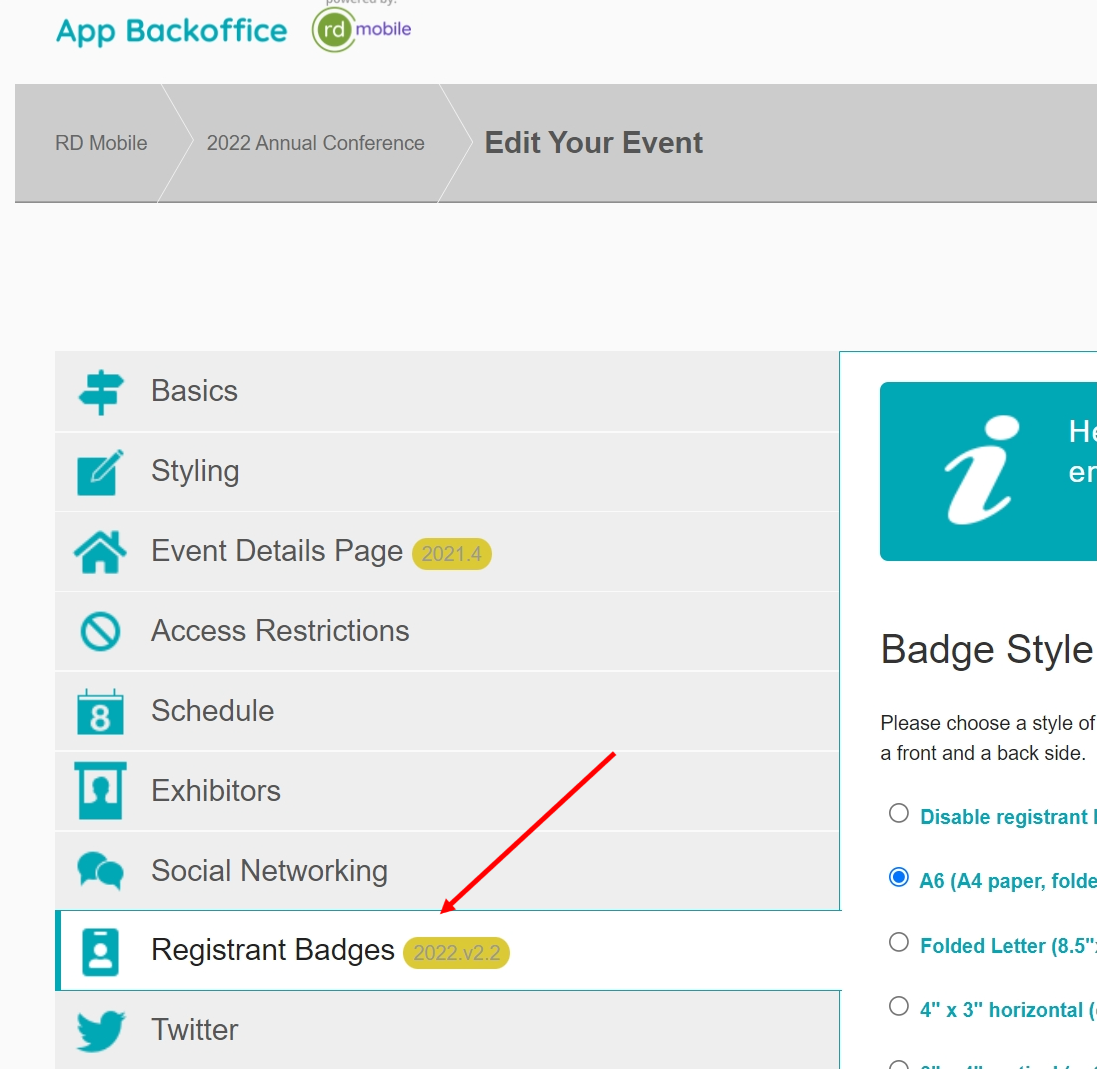
- Set a Badge Style and Badge Logo:
- Badge Style: With the 2022.v2.2 release, two new badge styles were introduced: A6 (A4 paper, folded into quarters) and Folded Letter (8.5” x 11” paper, folded into quarters).
- Badge Logo: Selecting one of the new badge styles provides three options:
- No logo (event name will be shown, and the background will be set to the event Accent Color)
- Event logo, or
- Organization logo
- Configure Badge Types: Here you can define the type (e.g., attendee, exhibitor, or speaker) and the color for each badge category that will be reflected on the badge. *For more information, please see the section: "How to Configure Badge Types in the Backoffice" at the bottom of this article.
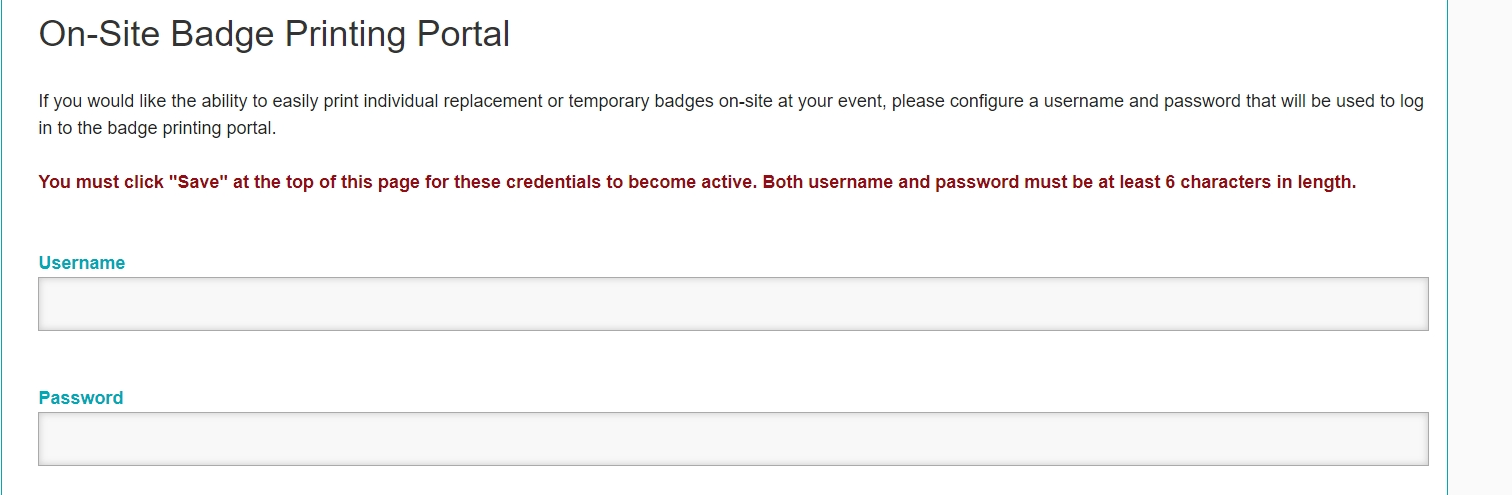
- On-Site Badge Printing Portal: The Username and Password needed to gain access to the Portal is set under this section.
Please keep in mind the following when creating the login credentials:- The Username is event-specific and cannot be used for other events.
- The Username and Password must be at least 6 characters long.
- Before clicking the open badge printing portal button to access the portal, please remember to click the Save button at the top-right-hand corner to submit the badge settings and credentials.
- To see a record of the badges printed from the Portal, click the download activity log button. This will generate a spreadsheet with the registrant ID, edits made, notes, and timestamp of when the badge was printed.
How to Access the Badge Printing Portal
- Backoffice Admins:
- Once the Portal login credentials are saved, admins in the Backoffice can access the portal through the open badge printing portal button mentioned above, or by clicking Enabled next to "Badge Printing Portal" on the main Event Info tab screen:
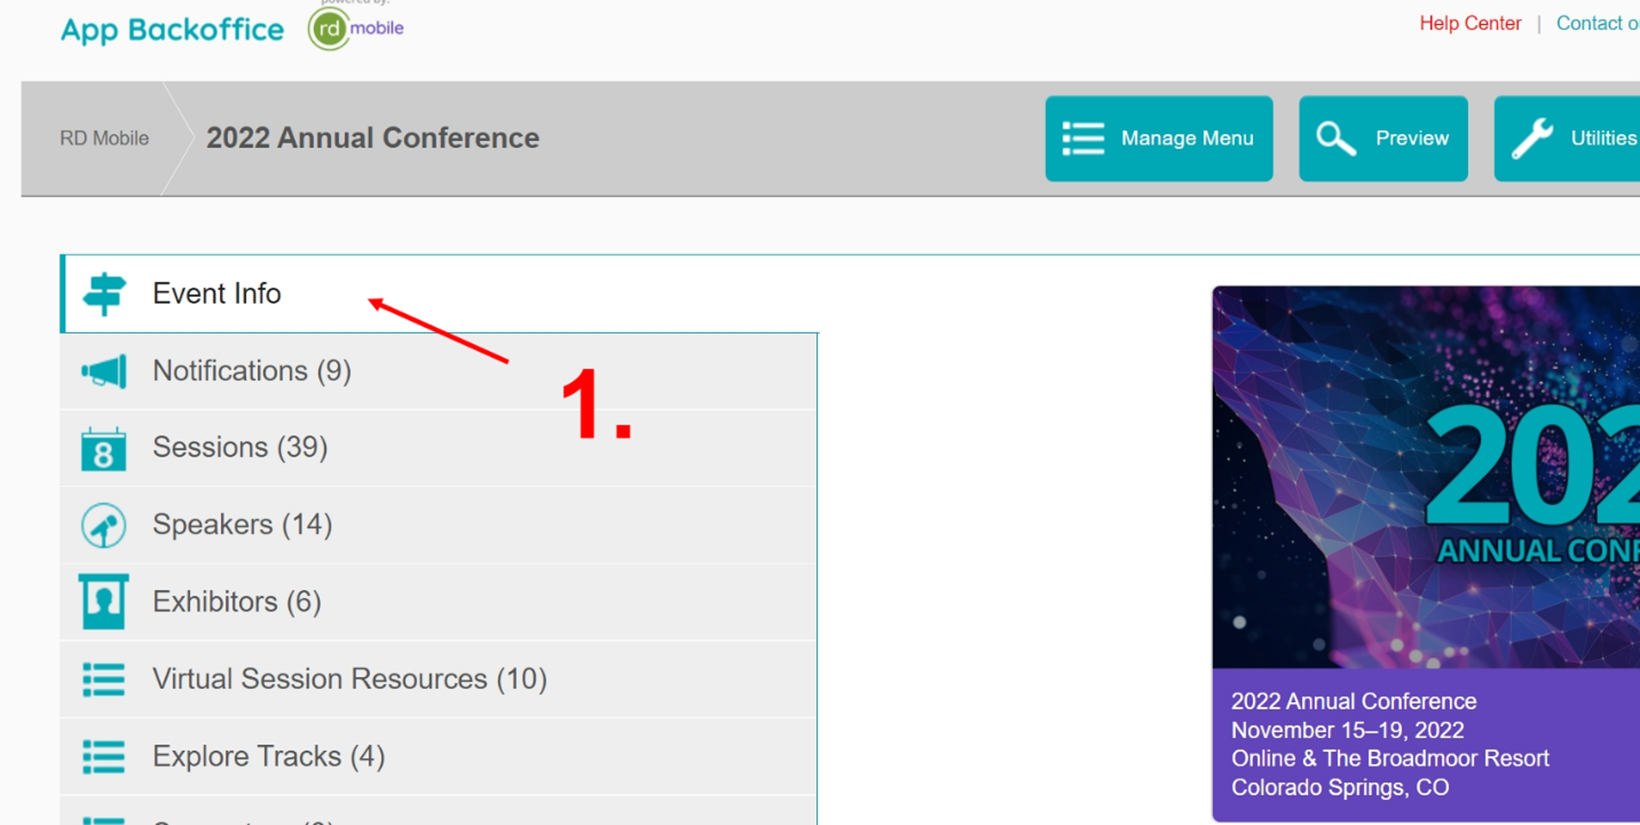

- Once the Portal login credentials are saved, admins in the Backoffice can access the portal through the open badge printing portal button mentioned above, or by clicking Enabled next to "Badge Printing Portal" on the main Event Info tab screen:
- On-Site Staff and Volunteers
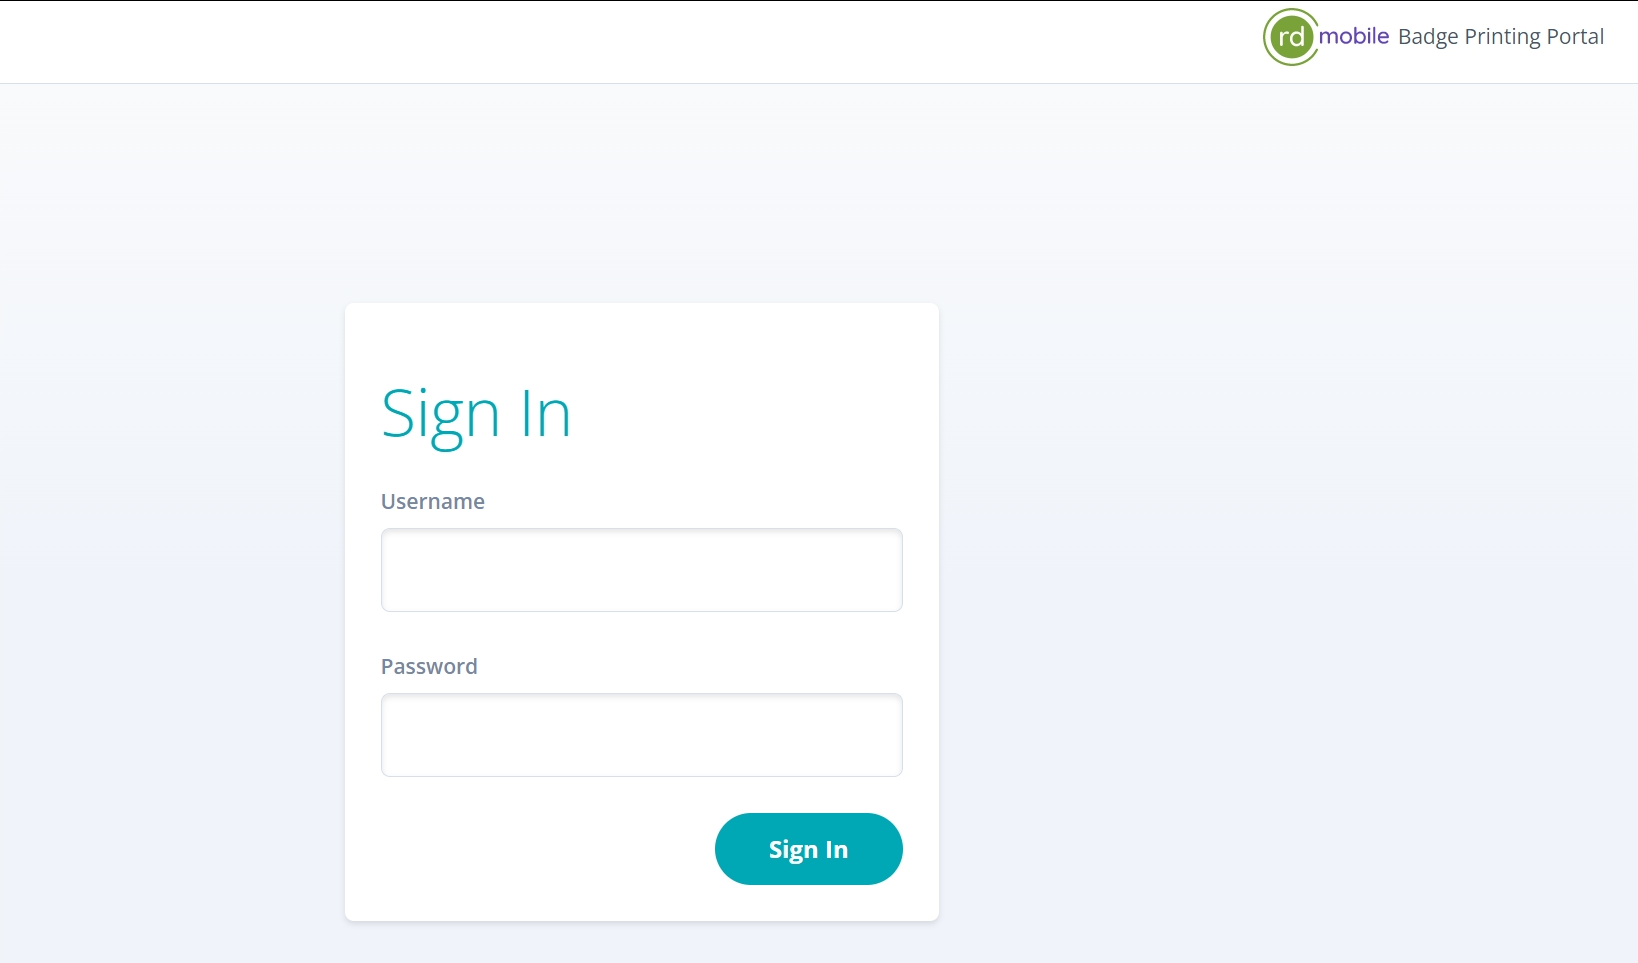
- For staff who do not have access to the Backoffice, the Badge Printing Portal URL must be provided along with the login credentials:
- The Portal URL: https://backoffice.rdmobile.com/BadgePrinting
- Login Credentials: An event-specific Username and Password configured in the previous section:
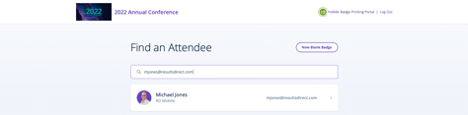
- Once on the Portal page, enter the event-specific login credentials and click "Sign In":
How to Find, Create, and Configure Badges in the Badge Printing Portal
- To find registrant badges, use the search box and enter the registrants name, email, or organization to locate them. Select the registrant to view their badge.

- The badge information in the badge printing portal is sourced from the back office. If there is a need to update badge info (i.e., a nickname) those changes can be done without affecting the registrant profile. The fields available are:
- Badge name
- Company name
- Badge type: A drop-down list of the pre-configured badge types will appear if field is blank
- Custom Badge Label 1 & 2: these are fields meant to include any extra information
- Notes: Not shown on the badge. Use this to record reason for changes, reprints, etc.
- The badge information in the badge printing portal is sourced from the back office. If there is a need to update badge info (i.e., a nickname) those changes can be done without affecting the registrant profile. The fields available are:
- A preview of the front and back of the badge with the registrant information, badge type, and QR code.
- Two “Print” buttons are available for use, in the upper left-hand corner and the lower right-hand corner.
- NOTE: Badges in the portal must be printed individually. There is no functionality for printing badges in bulk.

- NOTE: Badges in the portal must be printed individually. There is no functionality for printing badges in bulk.
- To create new badges for non-registrants, click the “New Blank Badge” button on the upper right-hand corner.
 NOTE: Newly created non-registrant badges will not be assigned a QR-Code. Instead, the text: "GUEST" will appear.
How to Configure Badge Types in the Backoffice
- Navigate to the “Configure Badge Types” button within the “Registrant Badges” tab. The button will open a new window.
- Here you can add, delete, and view the badge types and their assigned accent color

- Here you can add, delete, and view the badge types and their assigned accent color
- To add a new badge type, click “Add Badge Type” in the upper right-hand corner.
- A badge type label can be added.
- Any color can be assigned to said label. The color must be entered in a hexadecimal color code (e.g. #FF0000 for Red and
- An example appearance of the color will populate as a preview.
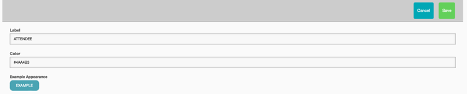
- Please remember to click the Save button at the top-right-hand corner to preserve any changes.
RD Mobile FAQ
Got a quick question? Check out RD Mobile's FAQ page for a quick answer. A collection of our most common client questions all in one place!
- Can I Copy and Paste an Event?
- What images can I upload to brand my app?
- How can I make changes to my app store listing?
- How often can I update event content in the apps?
- Registrant Profile vs. Participant Profile
- Do unpublished events automatically reflect changes I’ve made to event content?
- Are there differences in how Engagefully looks or behaves across different devices?
- How soon will attendees see the updated content on their devices?
- Can attendees export their sessions to their device calendar?
- Will Engagefully EVENTS work when the attendee doesn’t have Internet connectivity?
- Is it possible for attendees to manually fetch the most recent content?
- Does RD Mobile have surveys and polls?
- How will the custom values appear in the app?
- Where will ads show up?
- What is the difference between the Attendee Roster and Attendee Social Profiles?
- What is RSS?
- How do I remove flagged posts, photos, and comments from the app?
- What is the Personalized Dashboard?
- What different content can display in the Dashboard?
Get Started With Conversations
RD Mobile's Conversations provides a space for members, event participants, committees, and groups to connect and engage. Conversations is available as an add-on to RD Mobile’s Engagefully platforms.
About RD Products
RD Mobile’s industry-leading Engagefully & Engagefully EVENTS apps & platforms power year-round member engagement as well as in-person, hybrid/blended & virtual events - on both mobile & desktop devices.
Get Started With Year-Round Content
Ready to set up your year-round content on the Engagefully platform? Follow these steps to kickstart your engagement.
On-Site Tools & Support
This is a collection of tools, tips and best practices to support your participants leading up to and during your event.
Publish & Promote Your Event
Your event is ready to go, now it's time start engaging participants.
- How to Publish Your Event
- Invitation Email
- Follow-Up Emails
- Email Templates
- App Marketing Resource - How-To Guides
- Increasing App Downloads & Engagement - Marketing Campaign
- App Marketing Resource - Digital Business Card Exchange Promo Image
- App Marketing Resource - Website Samples
- App Marketing Resource - Spinner Samples
Add Basic Event Content
Ready to start adding content to your new event? Learn the basics here in this step-by-step guide.
- How do I create a Notification?
- Setting Up Sessions
- Setting Up Speakers
- How to Reorder Speakers and Designate Speaker Roles
- Setting Up Exhibitors
- How do I create tags for my Event?
- How to Add Registrants
- Registrant Profile vs. Participant Profile
- How to Manage Content In Bulk
- How do I enable and manage the event Dashboard?
- Add a New Menu Item
- Add a Map
- Setting Up Ads
Advanced Event Features
Want to supercharge your event? Browse through this collection of advanced features to determine what your event needs to take it to the next level.
- Event Roles
- How to Reorder Speakers and Designate Speaker Roles
- How to Create Exhibitor Booth Staff, Moderators, and Sponsor Representatives Using Custom Content.
- How to Create Custom Content
- What are Custom Labels used for?
- Event Integrations FAQ
- Embed Sessions on Your Web Site
- Embed Speaker Details on Your Website
- Embed Exhibitor Lists on Your Web Site
- How to Add Surveys, Evaluations & Polls
- Exhibitor Management Portal
- QR Code and Virtual Session Check-In
- Digital Business Card Exchange
- Setting Up Gamification
- Arranged Appointments
- Embed YouTube Content within Sessions
- Embed Vimeo Video Content within Sessions
Create a New Event
Ready to create a new event on the Engagefully & Engagefully EVENTS (formally Eventsential) platform? This step-by-step guide will walk you through creating and configuring a new event.